How to Design Landscape Lighting A Homeowner's Guide
- Akhilesh Joshi
- 3 days ago
- 18 min read
Great landscape lighting doesn’t just happen. It’s the result of a thoughtful plan that blends beauty, function, and a little bit of magic. I’ve found the best designs come from breaking it down into three simple parts: figuring out your goals, picking the right gear, and creating a layout with layers of light. This approach guarantees your outdoor space feels like a natural extension of your home after the sun goes down—safe, inviting, and absolutely stunning.
Your Blueprint for Brilliant Landscape Lighting
Before you even think about buying a single fixture, you need a plan. Seriously, this is the most important part. A well-designed lighting scheme is all about crafting an experience. It’s not just about making things visible; it’s about revealing the hidden beauty of your landscape and turning a dark, unused yard into a place you want to be.
The first, and most critical, question to ask yourself is: what am I trying to accomplish? The answer will guide every decision you make from here on out. Are you looking to boost your home’s curb appeal and make it the envy of the neighborhood? Maybe you’re dreaming of a cozy backyard oasis perfect for late-night chats or entertaining friends. Or, for many of us, it’s simply about making sure family and guests can walk around safely.
Define Your Lighting Goals and Zones
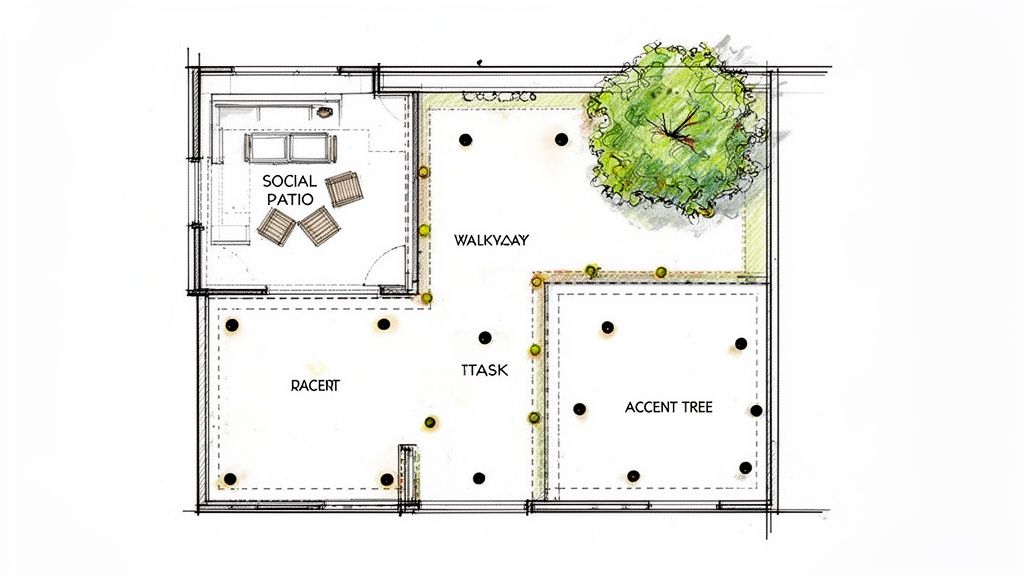
Once you have your main goals pinned down, it's time to get a bit more strategic and map your property into "lighting zones." This is a technique the pros use to avoid that flat, overly-lit look you see everywhere. It’s how you create depth and purpose.
Think of your yard in these three main categories:
Social Zones: These are the hubs of activity—your patio, deck, fire pit, or outdoor kitchen. The lighting here needs to be warm and welcoming, encouraging conversation without blinding anyone.
Task Zones: This is all about function and safety. We're talking about walkways, stairs, entryways, and the grill area. The name of the game is clear, glare-free light so no one trips or fumbles in the dark.
Accent Zones: Now for the fun part! This is where your inner artist comes out. These zones feature the stars of your landscape: a magnificent old tree, interesting architectural details on your home, a sculpture, or a bubbling water feature. This is how you create drama and draw the eye.
To help structure your thinking, here’s a simple framework I use with my clients.
Landscape Lighting Planning Framework
This table breaks down the core elements you need to consider before you start digging trenches or buying fixtures. It forces you to think through the "why" behind every light you place.
Planning Element | Key Questions to Ask | Example Application |
|---|---|---|
Overall Goal | What's the primary purpose? (e.g., ambiance, safety, curb appeal) | Create a warm, inviting atmosphere for backyard entertaining. |
Zone Identification | Which areas need light? (e.g., patio, path, trees) | Designate the patio as a "Social Zone" and the walkway as a "Task Zone." |
Key Features | What do I want to highlight? (e.g., favorite tree, stonework) | Uplight the Japanese Maple in the corner to serve as a focal point. |
Safety Needs | Where are the potential hazards? (e.g., steps, dark corners) | Place path lights along the walkway and a step light at the deck transition. |
Desired Mood | What feeling am I trying to create? (e.g., dramatic, subtle, cozy) | Use soft, warm light on the patio for a cozy feel, with dramatic uplighting on the trees. |
Thinking through these questions gives your project a solid foundation and ensures the end result is cohesive and intentional.
Visualize Your Plan with AI
Sketching out zones on paper is a great start, but let's be honest—it’s tough to truly picture how it will all look. This is where you can apply AI Landscape Design to visualize your ideas using photos of your own yard. Technology can be a game-changer for bringing your concepts to life.
Apps like DreamzAR are perfect for this. You just upload a picture of your actual yard and can start virtually placing different types of lights in your zones.
You can instantly see how uplighting that big oak will look or decide if path lights look better in a straight line or staggered. Playing with it beforehand helps you avoid rookie mistakes and saves you from buying the wrong stuff. If you want to get your base drawing just right, take a look at our guide on how to design a landscape plan.
A great lighting design reveals features; it doesn’t just flood an area with light. The goal is to create pockets of light and shadow that guide the eye and build atmosphere.
Prioritize Safety from the Start
Safety should be at the forefront of any outdoor project, and lighting is no exception. For almost every residential DIY project, a low-voltage (12V) system is the way to go. These systems are infinitely safer to install and operate than their high-voltage (120V) counterparts because the risk of electric shock is dramatically lower.
As you map out your design, understanding the basics of a professional architectural lighting installation can help you think through how to safely and effectively integrate light with your home's exterior. And one last thing: always do a quick check with your local city or county office about any permits or codes for outdoor wiring. Getting this stuff right in the planning stage ensures your beautiful new lighting is also completely safe.
See Your Lighting Design in Action Before Spending a Dime
Sketching out your landscape lighting plan on paper is a great start, but let's be honest—it has its limits. It’s one thing to draw a circle next to your oak tree and label it "uplight," but it's something else entirely to actually see how that glow will wash up the trunk and catch the leaves.
This is where technology completely changes the game. It bridges that frustrating gap between what's on paper and what it will look like in real life.
Instead of just hoping for the best, you can apply AI Landscape Design to visualize your ideas using photos of your own yard. That's the power of using AI to get a realistic preview of your entire plan before you buy a single fixture.
How AI Brings Your Lighting Ideas to Life
The whole process is much simpler than you might think. With an app like DreamzAR AI Landscape Design, you can move from guesswork to actually seeing the final product. The best part? You're working with a picture of your own home, not some generic stock photo.
You just snap a photo of your front yard, patio, or wherever you're working. Once you upload it, the app’s AI becomes your virtual design partner, letting you generate and play with endless lighting ideas right there on your property. It’s a visual-first approach that helps you nail down a look you'll love for years.
Experiment with Fixtures and Placement
This is where you really start to have fun. You can digitally place different lights and see how they play off your home’s features, your trees, and your garden beds. It's a hands-on way to learn what works for your specific space.
Think about what you can test in just a few minutes:
Uplighting a big tree: Drop a virtual spotlight at the base of your favorite maple. Instantly, you see the dramatic effect as light grazes the trunk and illuminates the canopy.
Lighting a path: Place path lights along your walkway. You can test out different spacing—are they better 5 feet apart, or does 8 feet feel more elegant? You'll know right away if you're creating a welcoming guide or an airport runway.
Setting the patio mood: What would a soft wash light look like around your seating area? Does it create that cozy vibe you’re after? Find out before you ever have to drill a hole.
This ability to iterate is priceless. You might discover that uplighting your home’s stone facade has way more impact than highlighting the bushes in front of it—a detail that's easy to miss on a 2D sketch.
The biggest win with AI visualization is the power to ask "what if?" What if the lights were warmer? What if that spotlight was aimed a little higher? You get to see the answer instantly, preventing expensive mistakes and that awful feeling of buyer's remorse.
Preview Layers and Color Temperatures
Any pro will tell you that great lighting design is all about layers—ambient, task, and accent lighting all working in harmony. Visualizing your plan with AI lets you see how these layers actually blend together in a way that’s almost impossible to predict on paper.
You can see how the gentle ambient glow from a wash fixture perfectly complements the focused accent light on a garden statue. This ensures your final design feels balanced and intentional, not just like a random collection of lights.
You can also play with color temperature. By applying AI Landscape Design to photos of your own yard, you can see for yourself whether the cozy warmth of a 2700K bulb or the crisp, clean look of a 4000K neutral light works better with your home’s paint and siding. It’s a subtle detail, but one that completely changes the mood of your entire property. To get a better sense of how AI can help with these kinds of choices, check out our ultimate guide on AI for landscape design.
Using an AI tool takes you from an abstract plan to a concrete visual. It empowers you to refine your ideas, confirm your choices, and move forward with confidence, holding a clear preview of the stunning, illuminated landscape you're about to create.
Choosing the Right Fixtures for Every Zone
With your lighting zones mapped out, it's time for the fun part: picking the actual hardware. The fixtures you choose are the heart and soul of your design, and this is where your vision really starts to come to life. Your decisions here will balance longevity, energy use, and pure aesthetics.
When you're figuring out how to design landscape lighting, there’s one technology that has completely taken over: LED (Light-Emitting Diode). For years, halogen was the go-to, but today, LED is the undisputed champ for just about every outdoor application you can think of. The reasons why are crystal clear.
The landscape lighting market is absolutely booming—it’s expected to jump from USD 14.8 billion in 2025 to a massive USD 34.7 billion by 2035. What’s driving this explosion? A huge part of it is the switch to energy-efficient LED lighting, which now commands a staggering 57.60% market share.
This isn't just a fleeting trend; it’s a complete shift. LEDs can slash energy use by up to 80% compared to old-school halogens and can last for an incredible 50,000 hours. That means less money spent on electricity and far fewer headaches changing burnt-out bulbs.
Matching Fixture Types to Your Zones
Not all lights do the same job. Each type of fixture has a specific purpose, and matching the right tool to the right task is what separates an okay design from a truly professional one.
Spotlights and Uplights: These are your drama-makers. They throw a narrow beam (usually 15 to 45 degrees) that’s perfect for highlighting specific features. Use them to cast light up into the canopy of a beautiful tree, graze a textured stone wall, or draw the eye to a unique piece of architecture.
Wash Lights and Flood Lights: With a much wider beam, these fixtures are all about covering broad areas with soft, even light. They're ideal for lighting up a large hedge, the side of your house, or providing general ambient light for a patio where you entertain.
Path Lights: Just like the name says, these are for your task zones. They cast light downward to illuminate walkways and driveways, ensuring everyone can get around safely without being blinded by glare.
Well Lights (In-Ground Lights): If you want a clean, almost invisible look, well lights are the answer. They’re installed flush with the ground, making them perfect for uplighting trees or columns from below without creating a tripping hazard.
Hardscape Lights: These are slick little fixtures designed to be built right into retaining walls, deck railings, and stairs. They add subtle, functional light for safety and give your design a high-end, integrated feel.
Finding the Perfect Color Temperature
Beyond the fixture itself, you have to think about the color of the light, which is measured in Kelvin (K). This one choice has a massive impact on the entire mood of your space.
A warm, golden glow feels cozy and traditional, while a crisp, cool white light comes across as modern and clean.
Pro Tip: For a cohesive, high-end look, stick to a single color temperature for the majority of your design. A warm white around 2700K to 3000K is almost always a winner. It creates a unified, inviting feel. You can always use a different temperature selectively to make a specific feature, like a fountain, really pop.
Visualize Your Fixture Choices with AI
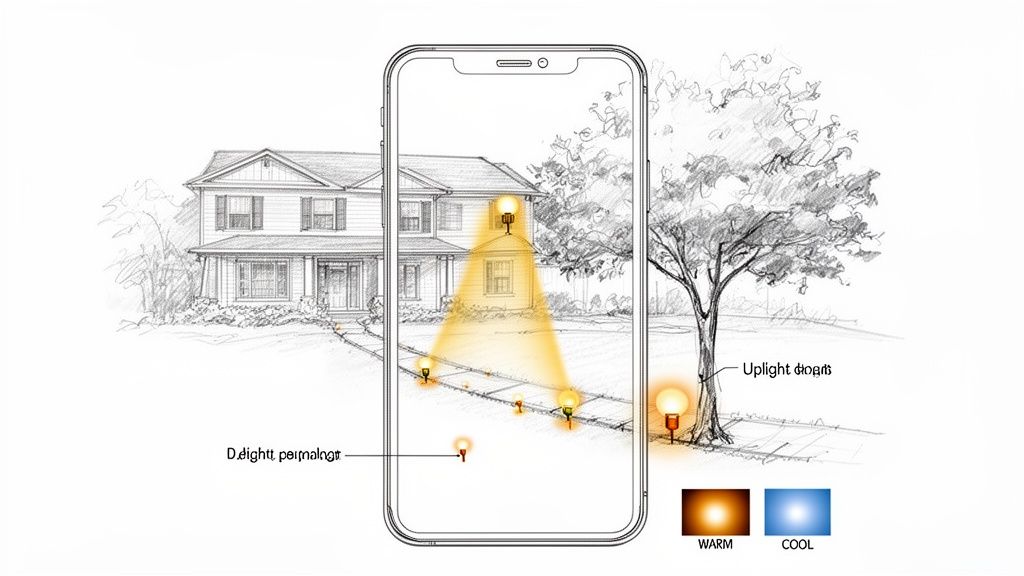
Picking fixtures and color temperatures can feel a bit abstract when you're just looking at them online or in a store. This is another spot where you can apply AI Landscape Design to visualize your ideas using photos of your own yard. Before you spend a dime, you can use an app like DreamzAR to see what these choices will actually look like on your property.
The screenshot above shows how you can digitally place path lights along a walkway right in the app. This is your chance to experiment with different fixture styles and play with spacing to see what looks best in your yard.
By seeing a realistic preview, you can confidently decide if a warm 2700K wash light or a cooler 4000K spotlight is the right call. It takes all the guesswork out of the process, ensuring the fixtures you buy will create the exact effect you’re hoping for.
For more ideas, check out our collection of landscape designs for backyards to see how different lighting and plant combinations come together in the real world.
Mastering Pro Lighting Techniques
Having the right fixtures is just the start. The real magic in landscape lighting comes from knowing how to use them. It’s an art form, really—a way of painting with light and shadow to create a specific mood, add depth, and bring a little drama to your evenings. This is where you graduate from simply lighting up your yard to truly sculpting it.
Any great design is built on three distinct layers of light. Think of them like ingredients in a recipe. Each one has a specific job, but they all work together to create something special.
Ambient Lighting: This is your foundation. It provides a soft, general glow for visibility in gathering spots like patios or decks. The idea is to create a comfortable, welcoming atmosphere, not a harsh glare.
Task Lighting: This layer is all about function and safety. It’s the focused light you need to make sure paths, stairs, and doorways are clearly visible to prevent any trips or stumbles.
Accent Lighting: Now for the fun part. This is where the "wow" factor comes in. Accent lighting is all about drawing the eye to your landscape's best features, whether that’s a beautiful old tree, a textured stone wall, or a unique garden sculpture.
This flowchart breaks down how the key decisions you make—from the type of bulb to the fixture style—all tie back to achieving these layers.
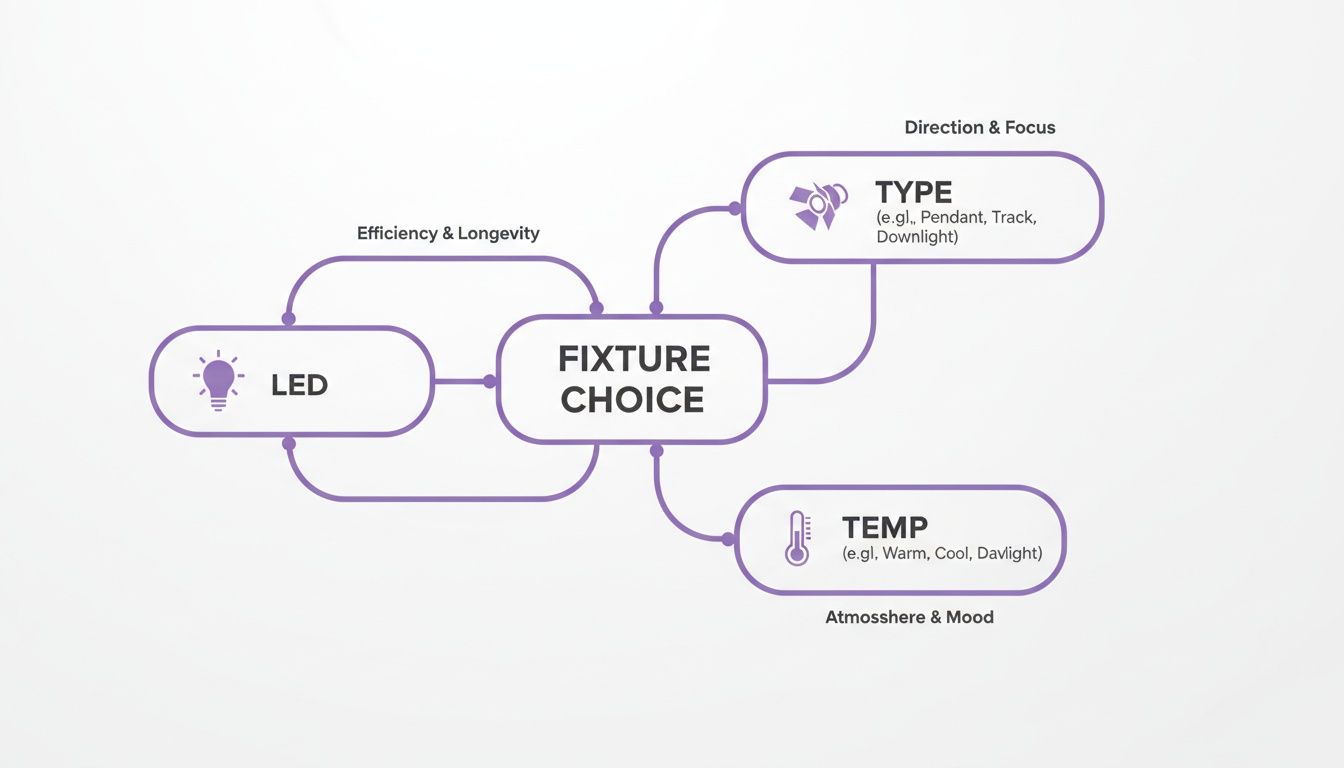
As you can see, everything from the bulb technology (LED) to the color temperature you choose plays a role in bringing your final vision to life.
Creating Depth with Specific Techniques
Once you get the hang of layering, you can start playing with specific techniques to really make your landscape pop. These are the tools of the trade that designers use to paint with light.
We've put together a quick table outlining some of the most common methods. These are your go-to moves for creating a truly dynamic and layered lighting scheme.
Technique | Description | Best Used For |
|---|---|---|
Uplighting | Placing a fixture at the base of an object and aiming the light upward. | Highlighting trees, architectural columns, and creating dramatic focal points. |
Downlighting (Moonlighting) | Mounting a fixture high in a tree, aimed downward to mimic natural moonlight. | Casting soft, dappled shadows on lawns, patios, or garden beds below. |
Silhouetting | Placing a light source behind an object, aimed at a vertical surface like a wall. | Emphasizing the unique shape of a sculptural plant or statue. |
Grazing | Positioning a light very close to a textured surface, with the beam aimed nearly parallel to it. | Making the texture of stone walls, brick, or tree bark really stand out. |
Each of these techniques adds a different kind of character to your design. Mixing and matching them is how you create a rich, visually interesting outdoor space after the sun goes down.
Visualize Techniques with AI Landscape Design
Struggling to decide between uplighting that big oak tree or creating a soft moonlighting effect from its branches? It can be a tough call. This is the perfect moment to apply AI Landscape Design to visualize your ideas using photos of your own yard.
With an app like DreamzAR, you can simply upload a picture and start experimenting with these pro techniques virtually. You can see in an instant if grazing your stone fireplace gives you the dramatic effect you're after, or if silhouetting those ornamental grasses would be more striking. It completely takes the guesswork out of the equation, letting you play with different placements and angles before you commit.
For a deeper dive, our podcast has some great insights on AI-driven lighting placement for landscapes that can help you get the most out of this approach.
Avoiding Common Lighting Mistakes
Knowing what not to do is just as important as knowing what to do. I’ve seen a few common missteps completely undermine an otherwise beautiful design.
The goal is to create an elegant scene, not an airport runway. Avoid placing path lights in a perfectly straight, evenly spaced line. Instead, stagger them on opposite sides of the path for a more natural and visually interesting look.
Keep an eye out for these potential pitfalls:
Light Trespass: Make sure your lights aren't blasting into your neighbor's bedroom window or creating a hazard for passing cars. Aim your fixtures carefully to keep the illumination contained within your property lines.
Over-Lighting: More light isn't always better. Too much brightness can create harsh "hot spots" that look unnatural and jarring. Use just enough light to get the job done beautifully.
Ignoring Glare: The light source itself should be hidden whenever possible. You want to see the effect of the light, not the blinding bulb. Use glare shields and smart placement to keep the fixtures themselves out of direct sight lines.
Wiring, Installation, and Smart Controls
With your layout perfected and fixtures in hand, it’s time to bring your design to life. Don't be intimidated by the wiring—a low-voltage system is surprisingly straightforward. It really just boils down to three key parts: the transformer, the low-voltage cable, and the lights themselves. This is where your digital plan becomes a beautifully illuminated reality.
The transformer is the heart of the whole operation. It plugs into a standard outdoor GFCI outlet and does one crucial job: it "steps down" your home's 120-volt power to a much safer 12-volt current. This is precisely why low-voltage lighting is such a popular DIY project; it seriously reduces the risk of electric shock.
Get the Right Transformer from the Start
Choosing the right size transformer isn't just a suggestion; it's critical for a reliable, long-lasting system. The good news is that figuring it out is simple. You just have to add up the wattage of every single bulb you plan to install.
Let's say you have ten 5-watt path lights and four 7-watt spotlights in your design. The math looks like this:
(10 lights x 5 watts) + (4 lights x 7 watts) = 50 + 28 = 78 total watts.
Here's a pro tip that will save you headaches down the road: your total wattage should never exceed 80% of the transformer's maximum capacity. For our 78-watt system, a 100-watt transformer is cutting it too close (78 is 78% of 100). A 150-watt transformer is a much smarter choice. It gives you plenty of headroom and the flexibility to add more lights later without overloading anything.
This one simple calculation prevents dimming lights and premature failure. Don't skip it.
Running and Burying Your Cable
After you’ve mounted the transformer, the next job is to lay out the low-voltage cable. Think of this as the power delivery network that connects everything. For most residential projects, a shallow trench about 3 to 6 inches deep is all you need to protect the cable from the lawnmower and everyday foot traffic.
Keep in mind that long cable runs can cause something called "voltage drop," which makes the lights at the end of the line look dimmer than those closer to the transformer. You can fight this by using a heavier gauge wire (like a 12-gauge instead of a 16-gauge) for any runs over 100 feet. It also helps to place the transformer in a central location to keep the cable runs as short as possible. Before you start connecting anything, it’s always a good idea to check out a practical guide to wiring a lighting circuit to make sure you’re following safety standards.
Step Up Your Game with Smart Controls
The days of relying on a clunky mechanical timer are long gone. Today's smart controls give you an incredible amount of command over your landscape lighting, making it a truly dynamic and responsive part of your home.
Modern setups can include:
Wi-Fi and Bluetooth Systems: These let you manage your entire system from an app on your phone. You can turn lights on or off, set detailed schedules, and dim the lights from anywhere in the world.
Smart Home Integration: Sync your lights with platforms like Amazon Alexa or Google Assistant. There’s nothing better than saying, "Alexa, turn on the backyard lights," and watching your landscape come to life.
Custom Scenes and Zoning: Program specific "scenes" for different occasions. You might have a "Party Mode" that brightens up the patio and a "Relax Mode" that casts a soft, warm glow. You can also create zones to control different areas of your yard independently.
One Last Look Before You Dig
Even with a perfect plan on paper, it's easy to have second thoughts once you’re standing in the yard. This is where you can apply AI Landscape Design to visualize your ideas using photos of your own yard. Before you dig a single trench, use an app like DreamzAR to overlay your planned wiring paths and fixture locations right onto a photo of your property.
This final check helps confirm that your layout makes sense both visually and practically. You can even experiment with different smart control zones to see which groups of lights work best together. If you want to get your layout really precise, knowing your yard’s dimensions is a huge help. You can find some great tips in our guide on how to measure your yard.
The All-Important Nighttime Adjustment
The last, absolutely non-negotiable step of any lighting installation happens after the sun goes down. Once everything is wired up and running, you have to walk your property and fine-tune every single fixture. This is the step that separates a good installation from a truly great one.
Be on the lookout for hot spots, harsh glare, or uneven shadows. A spotlight that’s aimed just a few degrees too high can create an ugly flare on the side of your house. A path light might need a tiny twist to eliminate a distracting dark patch on the walkway. Take your time with this. Adjust the angles and tweak the positions until the final effect is exactly what you envisioned.
Common Landscape Lighting Questions Answered
Even the best-laid plans come with questions. It's totally normal. As you start mapping out your design, a few things will inevitably pop up. Here are some of the most common questions I hear from homeowners, along with some straightforward answers to keep you moving forward.
How Far Apart Should My Landscape Lights Be?
There’s no magic number here—the right spacing really depends on the specific light fixture and the look you're going for. Getting this right is what separates a natural, elegant design from something that feels forced.
For path lights, a good starting point is to place them 5 to 8 feet apart. This usually creates soft, overlapping pools of light that guide the way safely without that harsh, airport "runway effect." When you're lighting up a tree or a wall, it’s less about the distance between fixtures and more about the beam angle of the bulb and how intense you want the effect to be.
This is the perfect time to fire up an AI tool before you start digging holes. You can apply AI Landscape Design to visualize your ideas using photos of your own yard. With an app like DreamzAR, you can virtually place lights at different distances—5 feet, 7 feet, 9 feet—and see what feels right. A few minutes of digital trial and error can save you a ton of physical work later.
Can I Mix Different Color Temperatures?
Absolutely, but you have to do it with a clear purpose. Just throwing a random mix of warm and cool lights together will make your yard look chaotic and disjointed. The trick is to pick a dominant color temperature that ties everything together.
A great strategy is to use a consistent warm white (somewhere around 2700K to 3000K) for most of your lighting. Use it for your home’s facade, your most important trees, and any general ambient light. This creates a cohesive, welcoming vibe. Then, you can bring in a different temperature—often a cooler one—as a strategic accent for something specific, like a modern sculpture or a water feature.
What Are the Most Common DIY Lighting Mistakes?
I've seen a few recurring trip-ups over the years that can really undermine a good lighting design. Just knowing what they are can help you steer clear.
Here are the top three to watch out for:
Going Overboard: It's so tempting to use too many lights or fixtures that are way too bright. This usually just creates glaring "hot spots" that blow out all the beautiful textures of your plants and stonework. Subtlety is your friend.
The Runway Effect: This is a classic rookie mistake. Placing path lights in a perfectly straight, evenly spaced line looks unnatural. Stagger them on alternating sides of the path for a much more organic and visually interesting flow.
Forgetting About Upkeep: Landscape lighting isn't a one-and-done deal. Plants grow over fixtures, lenses get caked with dirt, and bulbs burn out. A little regular cleaning and tweaking will keep your design looking as good as the day you installed it.
How Much Does Professional Landscape Lighting Cost?
The price tag for a professional installation can swing pretty wildly. It really depends on the size of your property, the quality and number of fixtures you choose, how complex the wiring is, and of course, local labor rates.
For a rough idea, a smaller, high-quality system with about 10-15 LED fixtures might start in the $2,000 to $4,000 range. If you have a larger property or want a more complex design with dozens of lights and smart home controls, the cost can easily jump north of $10,000. This is exactly why having a solid plan is so crucial. When you apply AI Landscape Design to visualize your ideas using photos of your own yard, you can create a detailed visual plan first and show it to contractors to get much more accurate quotes, making sure there are no surprises.
Ready to stop guessing and start seeing? With DreamzAR AI Landscape Design, you can see exactly how your lighting ideas will look on your own home. Just upload a photo of your yard to instantly generate unlimited designs, play with different fixture placements, and get your lighting layers perfect before spending a dime.
Your dream yard is literally one photo away. Download DreamzAR FREE on the App Store today at https://www.dreamzar.app and see the magic for yourself.