How to Build Steps Into a Hillside A DIY Guide
- Akhilesh Joshi
- 3 days ago
- 13 min read
Tackling a sloped yard can feel intimidating, but building steps into a hillside is one of the most rewarding projects you can take on. It's a fantastic way to turn a tricky, unusable grade into a safe, beautiful, and accessible pathway, seriously boosting your home's curb appeal and functionality.
The whole process really boils down to four key stages: figuring out what you're working with on the slope, picking the right materials like stone or timber, digging and creating a rock-solid base, and finally, building the steps themselves with an eye toward proper drainage.
Conquering Your Slope: An Introduction to Hillside Steps
Let's be honest—transforming a steep, overgrown hill into an elegant and useful set of steps seems like a massive job. And it can be. But if you break it down into smaller, manageable chunks, it becomes a completely doable project that will fundamentally change how you use your yard.
This guide is all about the practical, real-world side of building on a slope. We'll get into how to properly assess your specific terrain, choose materials that will actually last in your climate, and map out a design that is both safe to walk on and easy on the eyes. Understanding the unique challenges of sloped ground is non-negotiable, a skill that professional sloping block specialists have perfected over years of experience.
Before you even think about grabbing a shovel, a successful project starts with a clear vision. This is where modern tools can save you a ton of guesswork and headaches. You can use AI Landscape Design tools to visualize your ideas using photos of your own yard.
See Your Options Instantly: Forget trying to imagine it. Just upload a photo of your yard to an app like DreamzAR and let it generate dozens of variations. You can see exactly how different materials and layouts will look on your property.
Prevent Costly Mistakes: Is a straight run best, or would a gentle curve or a switchback design work better? Experiment with all the options digitally without committing a dime or lifting a single stone.
Gain Confidence: This digital planning phase is invaluable. It helps you lock in your aesthetic and functional goals, making sure the final result is something you'll actually love.
A well-planned set of hillside steps does more than just connect Point A to B. It becomes an integrated part of your landscape, helping to control erosion and creating new pockets for garden beds or landings along the way.
Think of this guide as your complete roadmap, taking you from that initial digital mock-up all the way to the final construction and landscaping touches. With a solid plan in hand, you'll have the confidence to tackle that slope and build a stunning feature that will last for years.
Visualize Your Hillside Steps Before You Dig
Before you grab a shovel and start tearing into that slope, having a clear picture of the finished product is absolutely critical. I’ve seen it happen too many times: a project starts with a vague idea, and the result is a set of steps that just doesn't feel right. Guesswork can lead to expensive do-overs and a final look that misses the mark.
Thankfully, we don't have to rely on guesswork anymore. Technology has given us some incredible tools to make the planning process not just easier, but far more accurate.
AI-powered landscape design apps, like DreamzAR, let you bring your ideas to life right on your own property. It’s a surprisingly straightforward process. You just snap a photo of your yard, upload it, and the AI can generate dozens of design variations in seconds. This isn't about looking at generic pictures on Pinterest; it’s about seeing how different styles and materials will look in your actual space.
See Your Ideas in Your Yard
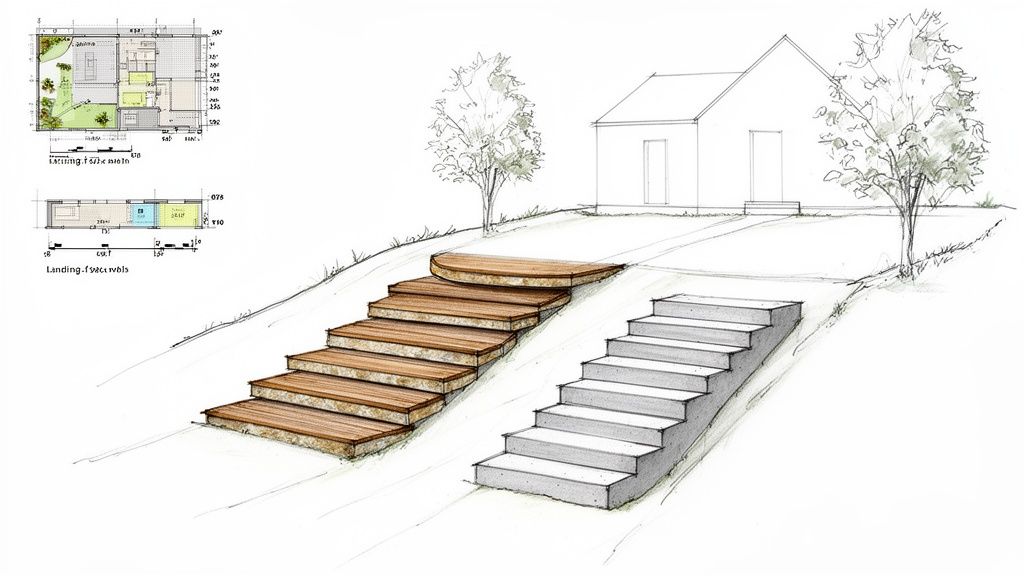
Torn between rugged natural stone, rustic timber sleepers, or sleek modern concrete treads? An AI tool can instantly show you what each one looks like. You can see how the textures and colors play off your home's exterior and the surrounding garden, taking all the "what ifs" out of choosing materials. By using a photo of your own hillside, you get a personalized preview that's far more valuable than a generic sketch.
It's not just about materials, either. You can play around with different layouts. Maybe a straight, direct path is what you need. Or perhaps a gently curving staircase would soften the incline and create a more natural flow. This digital playground lets you make confident decisions before you spend a dime on materials or labor.
The real magic of AI visualization is how it turns an abstract concept into a concrete, actionable plan. You're not just crossing your fingers and hoping it looks good—you're getting a realistic preview of the final outcome.
Use Augmented Reality for a Real-World Preview
The visualization doesn't have to stop at static images. Many of these tools, DreamzAR included, take it a step further with augmented reality (AR). Using your phone’s camera, you can virtually place the 3D model of your steps right onto your hillside.
This immersive experience is a game-changer. You can literally walk the path, see how the landings feel, and check the overall flow from different angles. It's incredibly helpful for getting the scale just right. Are the steps wide enough? Does the rise feel comfortable to walk? AR helps you answer these crucial questions, ensuring the final build is exactly what you envisioned.
For DIYers, this is huge. Visualizing your steps with AI-generated designs can slash planning errors by an estimated 70%, which means more precise measurements for a safe, sturdy, and great-looking set of stairs. You can read more about how to use AR in landscape from inspiration to reality in our in-depth guide.
Choosing the Right Materials for Your Steps
Picking the right material for your hillside steps is a huge decision. It dictates everything from the finished look and feel to how much time you'll spend on upkeep down the road. Every option has its own unique mix of cost, installation headaches, and style. Getting this choice right is the key to building steps you'll actually love using for years.
Before you commit to a truckload of stone or a pile of lumber, it’s a massive help to see what it will actually look like on your property. This is where AI Landscape Design is a game-changer. By uploading a photo of your yard to an app like DreamzAR, you can instantly test-drive different materials. See for yourself how rugged fieldstone looks against your house, or how clean, modern composite treads would transform the path. This process lets you visualize your ideas directly on your own landscape, ensuring you feel confident before you spend a dime.
Timber for a Natural Look
There’s a reason pressure-treated timber is so popular. It’s one of the most affordable materials out there, and it’s pretty forgiving for a DIYer to cut and install. Timber steps just seem to melt right into wooded or rustic landscapes, giving you a soft, natural-looking pathway.
The big catch, though, is lifespan. Even treated wood will eventually give in to rot and insects, especially if you live somewhere damp. You can realistically expect to get 15-20 years out of them, but that number can drop fast without great drainage and regular sealing.
Natural Stone for Timeless Durability
If you want a truly permanent, classic solution, you just can't beat natural stone. Materials like flagstone, fieldstone, or granite bring an unmatched durability and a high-end look that feels like it’s always been part of the garden. Because every stone is different, your steps will have a one-of-a-kind character. We've got some great examples to get your ideas flowing in our guide to 10 inspiring garden rock ideas to try in 2025.
The trade-off for all that beauty is cost and pure physical labor. Stone is incredibly heavy, and moving it into place is a serious workout. It’s also one of the pricier material choices, but when you consider that these steps will likely outlive you, the long-term investment starts to make a lot of sense.
Pro Tip: Never, ever lay heavy stone steps directly on soil. Always build on a deep, compacted gravel base. This is the single most important thing you can do to stop the stones from shifting or sinking from frost heave and water erosion.
Concrete and Modular Blocks for Versatility
Concrete hits that sweet spot of durability and design flexibility. You've basically got two paths here:
Pre-cast Concrete Blocks: These are your straightforward, easy-to-stack workhorses. They’re uniform, stable, come in lots of colors and textures, and are a very cost-effective way to get the job done right.
Poured Concrete: This route gives you total creative freedom but definitely requires more skill. You have to be comfortable building forms and finishing the concrete. The result, however, is an incredibly solid, seamless staircase that can last for decades.
Modern modular kits and composite treads offer another angle, focusing on easy installation and almost zero maintenance. They might cost more upfront, but these systems are designed for quick assembly and are built to resist rot, fading, and warping. They're a fantastic "set it and forget it" option for a busy homeowner.
Comparison of Hillside Step Materials
Choosing the right material involves balancing your budget, your willingness to do the work (or pay someone else to), and the aesthetic you're aiming for. This table breaks down the most common options to help you see how they stack up against each other.
Material | Average Cost per Step | Durability / Lifespan | Installation Difficulty | Aesthetic |
|---|---|---|---|---|
Timber | $25 - $50 | 15-20 years | Low to Moderate | Natural, Rustic |
Natural Stone | $75 - $200+ | 100+ years (Lifetime) | High | Timeless, Elegant |
Concrete Blocks | $30 - $60 | 50+ years | Moderate | Uniform, Versatile |
Poured Concrete | $50 - $120 | 50+ years | High | Modern, Custom |
Modular / Composite | $60 - $150 | 25-50 years | Low | Modern, Low-Maintenance |
Ultimately, the best choice is the one that fits your property's style and your personal priorities. A rustic cabin might call for timber, while a formal garden almost demands natural stone. Take your time, weigh the pros and cons, and you'll end up with a hillside staircase that's both beautiful and built to last.
Laying the Groundwork: Nailing the Excavation and Foundation
The long-term success of your hillside steps comes down to the work you do before a single tread goes in. A stunning design means nothing if the foundation is weak and water has nowhere to go. Proper excavation and drainage aren't just suggestions; they are the absolute most critical part of building steps that will stand the test of time.
First things first, you need to bring your design into the real world. Grab some stakes and string to mark out the exact path of your staircase on the slope. This simple outline is your guide for getting the rise and run right, which is key to making sure each step is consistent, safe, and easy to walk on. Before you start digging, it's a good idea to check out our guide on how to measure a yard to be certain your dimensions are spot on.
Mastering Excavation and Compaction
With your path marked, the real work begins. The goal here is to dig a solid, level base for every single step. This is more than just scraping off the topsoil; you need to dig a trench deep enough to hold a serious gravel base—usually 4 to 6 inches of compacted aggregate is what I recommend.
This compacted gravel foundation is your best defense against the two biggest enemies of any hillside project: water damage and frost heave. To get it right, proper soil compaction is a must. For a truly solid base that won’t shift, you might want to look into efficient battery-powered compaction equipment. If you skip this, water will just saturate the soil, turning it to mud and causing your steps to sink, shift, or heave up during those freeze-thaw cycles.
Visualize Your Foundation with AI
While you're planning all the dirty work, don't forget you can actually see how it will all come together. Using an AI Landscape Design app, you can take a photo of your excavated hillside and start overlaying different materials to see how they’ll fit in the space you've prepped. This is a great way to visualize your ideas on your actual property, double-checking your layout and material choices before you start hauling heavy stone or timber. Seeing how thick flagstone slabs sit on the gravel versus how timber risers align can save you from a huge headache later.
This diagram shows a high-level view of how you might choose your primary materials after planning the foundation.
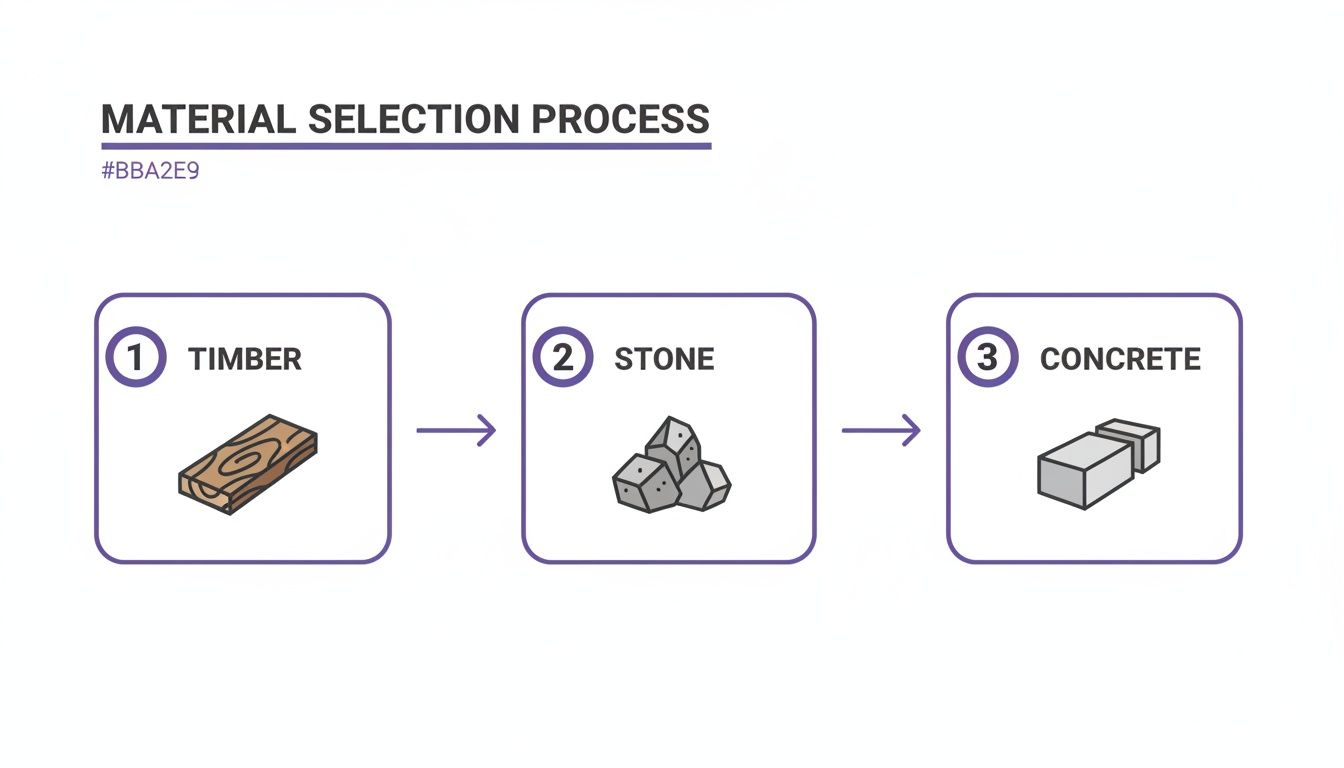
Whether you go with timber, stone, or concrete, they all demand a solid, well-drained foundation to stay put.
Advanced Techniques for Unshakeable Stability
For slopes that deal with a lot of water runoff, a simple gravel base might not cut it. Installing a French drain behind your top step or running one alongside the staircase is a pro-level move. This is basically a perforated pipe buried in gravel that intercepts water and channels it safely away from your steps, preventing hydrostatic pressure from pushing everything out of place.
Another technique I’ve used with great success is called 'batter,' which means angling each step just slightly back into the hill. Think about this: sites that use geotextile fabric with their steps see 90% less soil loss than untreated slopes. That’s huge, especially when you consider that 40% of global landslides are linked to poor drainage. The batter technique, where steps lean back into the hill at a 1:12 ratio, helps distribute the load and cuts failure rates by a staggering 80%. This subtle backward tilt literally locks the steps into the hillside, dramatically improving stability and stopping them from creeping forward over the years.
All your hard prep work is done—the slope is graded, the foundation is solid, and the drainage is sorted. Now for the fun part: actually building the steps. This is where you see the project come to life, transforming that tricky hillside into a beautiful, functional staircase.
How you build will obviously depend on your material choice, but the basic principles are always the same: keep it level, stable, and secure.
If you're working with timber, you'll be anchoring your risers with rebar and making sure each box is perfectly level before you fill it with compacted gravel. For natural stone, it’s all about getting each tread to sit solidly on the one below it, with just a slight forward tilt so water runs off. Modular blocks are often the easiest, designed to lock together for a super strong structure as you build your way up the hill.
Here's one step you can't skip, no matter what you're building with: backfilling. As you set each step, you have to fill in the space behind and underneath it with compacted soil or gravel. This isn't just filler—it's what locks the step into the hillside and stops it from shifting or wiggling when people walk on it.
Fine-Tuning the Vision with AI
Even with the steps partially built, it's not too late to refine your design. Before you set that final stone or make the last cut on your timber, an AI landscape design app can give you a powerful sneak peek of the finished product.
Just snap a photo of your work-in-progress. An app like DreamzAR can take that image and generate realistic visuals of the completed staircase, showing exactly how it will blend into your yard. This is the perfect moment to visualize your ideas using a photo of your own yard—you can audition different handrail styles, see how landscape lighting might look at night, or decide which plants will look best along the edges. It’s a fantastic final check to make sure everything comes together just right.
The Finishing Touches That Make All the Difference
A set of steps is functional, but it's the final details that turn it into a true landscape feature. These touches add safety, character, and a professional polish that completes the project.
Think about incorporating these key elements:
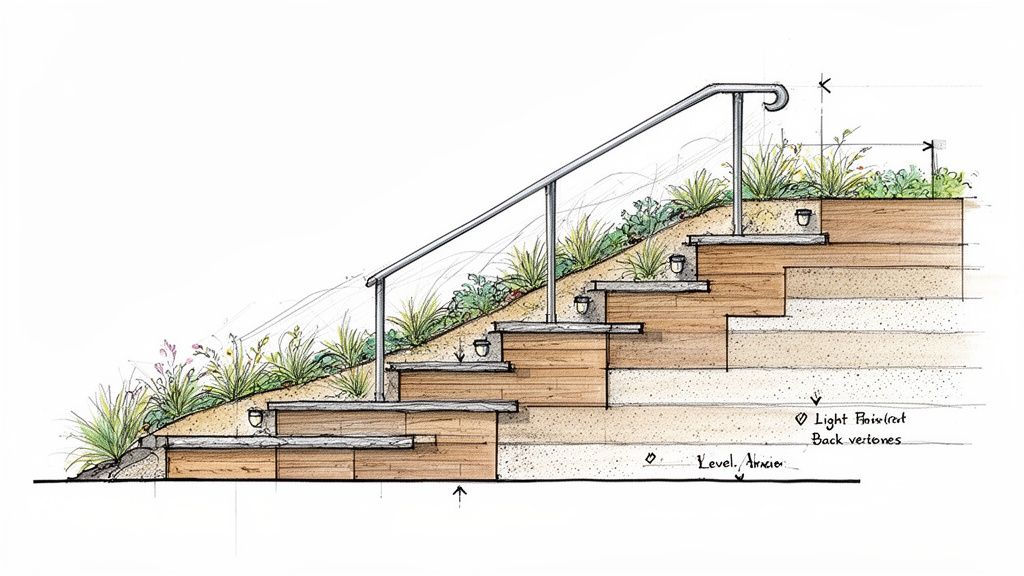
Handrails are a must. For any staircase more than just a few steps high, or on a particularly steep slope, a handrail isn't just a good idea—it's a critical safety feature.
Light it up. Low-voltage LED lights tucked under the lip of the treads or along the edges look amazing. They create a beautiful ambient glow and, more importantly, make the steps safe to navigate after dark.
Soften the edges. Planting groundcover or small shrubs along the sides of the staircase does more than just look good. It helps prevent erosion and beautifully blends the hardscape into the rest of your garden. Our guide on laying ground covers with DreamzAR has some great ideas to get you started.
You don't have to guess when it comes to safety and stability. Industry best practices show that steps built on a 4-inch gravel base with properly sized treads can slash slip-and-fall incidents by 75%. This aligns with building codes that often require a 10-inch minimum tread depth. An app like DreamzAR can help you visualize these principles—just upload a photo for unlimited designs and use the AR previews to get the scale just right. For a deeper dive into the data, you can discover more insights about staircase safety on datahorizzonresearch.com.
Common Questions About Building Hillside Steps
Even with the best plans in hand, building steps into a slope is one of those projects where questions always seem to surface right when you get started. Getting good answers can be the difference between a project that stalls out and one that you can be proud of for years.
Let's walk through some of the most common hurdles I see homeowners run into.
Do I Really Need a Permit for This?
This is usually the first question people ask, and for good reason. The answer almost always depends on your local building department, but there's a pretty reliable rule of thumb. Generally, if your staircase will be higher than 30 inches or has more than four risers, you're going to need a permit.
Don't skip this step. Seriously. A quick call to your local office before you start digging can save you from massive headaches and costly fines down the road.
My Hill is Really Steep. What Are My Options?
If you're dealing with a serious grade, a long, straight shot of stairs can look pretty daunting and feel like a workout every time you climb it. A much better approach is to break up the journey. You can incorporate landings to create resting points, or even design a gentle switchback that zigzags its way up the slope. This is not only more practical but often looks far more natural and integrated into the landscape.
How Can I See My Ideas Before I Build?
This is a huge one. It’s one thing to sketch an idea on paper, but it's another thing entirely to commit time and money without knowing how it's going to look on your actual property. This is where AI landscape design tools have become a game-changer.
An app like DreamzAR lets you snap a photo of your hillside and start generating dozens of different design concepts in seconds. You can visualize your ideas using your own yard's photo, instantly seeing how timber steps stack up against natural stone, or whether a winding path feels better than a direct one. The augmented reality (AR) feature even lets you virtually "place" the steps right there in your yard to check the scale and flow. It’s the perfect way to make confident decisions before a single shovel of dirt is moved.
Visualizing your project with AI isn't just for fun; it's a practical planning tool. It helps you catch potential design flaws, get the scale right, and ensure the final product truly complements your home and landscape.
What Is the Easiest Material for a DIYer?
If you're tackling this yourself and want the path of least resistance, my go-to recommendations are pressure-treated timber or modular concrete blocks.
Timber is forgiving—it's relatively lightweight, simple to cut, and easy to work with. Modular blocks are also fantastic for DIYers because they're designed to interlock, which simplifies construction and creates a super stable structure, often without any mortar. If you're looking for more details, check out our extensive FAQ page, which dives into many common project questions.
What’s the #1 Mistake I Should Avoid?
I see it all the time: a poor foundation and no thought for drainage. Laying steps directly on topsoil is a recipe for disaster.
You absolutely must excavate at least 4-6 inches for a compacted gravel base under every single step. This one crucial action prevents the vast majority of problems like shifting, sinking, and frost heave. Get the foundation right, and you'll ensure your hard work lasts for decades.
Ready to stop guessing and start visualizing? With DreamzAR, you can transform a photo of your yard into a professional landscape design in seconds. See exactly how your new hillside steps will look before you build. Download the app and bring your dream yard to life today at https://www.dreamzar.app.